
Building the Nightmare - Basing
/This series of blogs has been purposefully designed to supplement our discussion on the inspiration and creation of our army, Pannithor’s Nightmare, as shared on the Counter Charge Podcast. Hopefully we have shared enough information on our decisions and the process used to inspire you to create something unique of your own. In this installment Rob takes you through the process of creating the basing for this army.
One of the first things I had to figure out for this project was how I would go about making the books. I scoured all the local hobby and craft shops to see what types of dollhouse or miniature books were available. While we were able to use these tiny books for one character model in the army (our Brawler) they were way to small for what I really wanted for the larger sized basing. So next I explored the depths of 3D printing and again I wasn’t able to find anything with the look that I was going for. So given that I would be making these books from scratch I researched a few different materials. First I tried making books using real paper and cardboard. It was super time consuming and the books created were not very poseable. Next I tried foam core but it didn’t carve or sand well. It was also not durable and would not make a great base for attaching miniatures. I tried cork next but it was impossible to get the surface texture smooth and make it look like paper.


After some trial and tribulation I tried some old dried out Sculpy that I had lying around. Sculpy is an oven dried clay that remains a little pliable after baking. It takes detail very well and with the use of my clay rolling machine I was able to make thin “pages” that could be added together to form the book. The books could be open or closed and posed in a number of different ways. Plus it was relatively easy to curl corners and add damage to the pages. The possibility for scrolls were almost endless.


After locking in the material I went out and bought 2 pounds of beige sculpy to make all the books look consistent in color. Plus the neutral color also made painting them easier. Taking into account the infantry regiment base size and the scale of the “human” world we were going for I sketched out the dimensions for a book. I also drew a few sketches of how we could “pose” the book on the base to add visual interest. From there I modified the design to fit other base sizes while maintaining simlar proportions to keep everything aesthetically consistent.
All the books and scrolls were started by rolling the clay to the desired thickness using the clay roller machine. Next I cut the various pieces to the right length and width. For the pages I made them twice the size and folded them in half to create 2 pages. After baking, a stack of pages were wrapped in a cover and sometimes a decorative striping was added prior to baking again. In most cases each book had to be baked several times. Finally I added a few touches using Apoxie Sculpt or Green Stuff to make locks, latches and a book mark. All told it took several weeks to complete all the books and scrolls for the army.


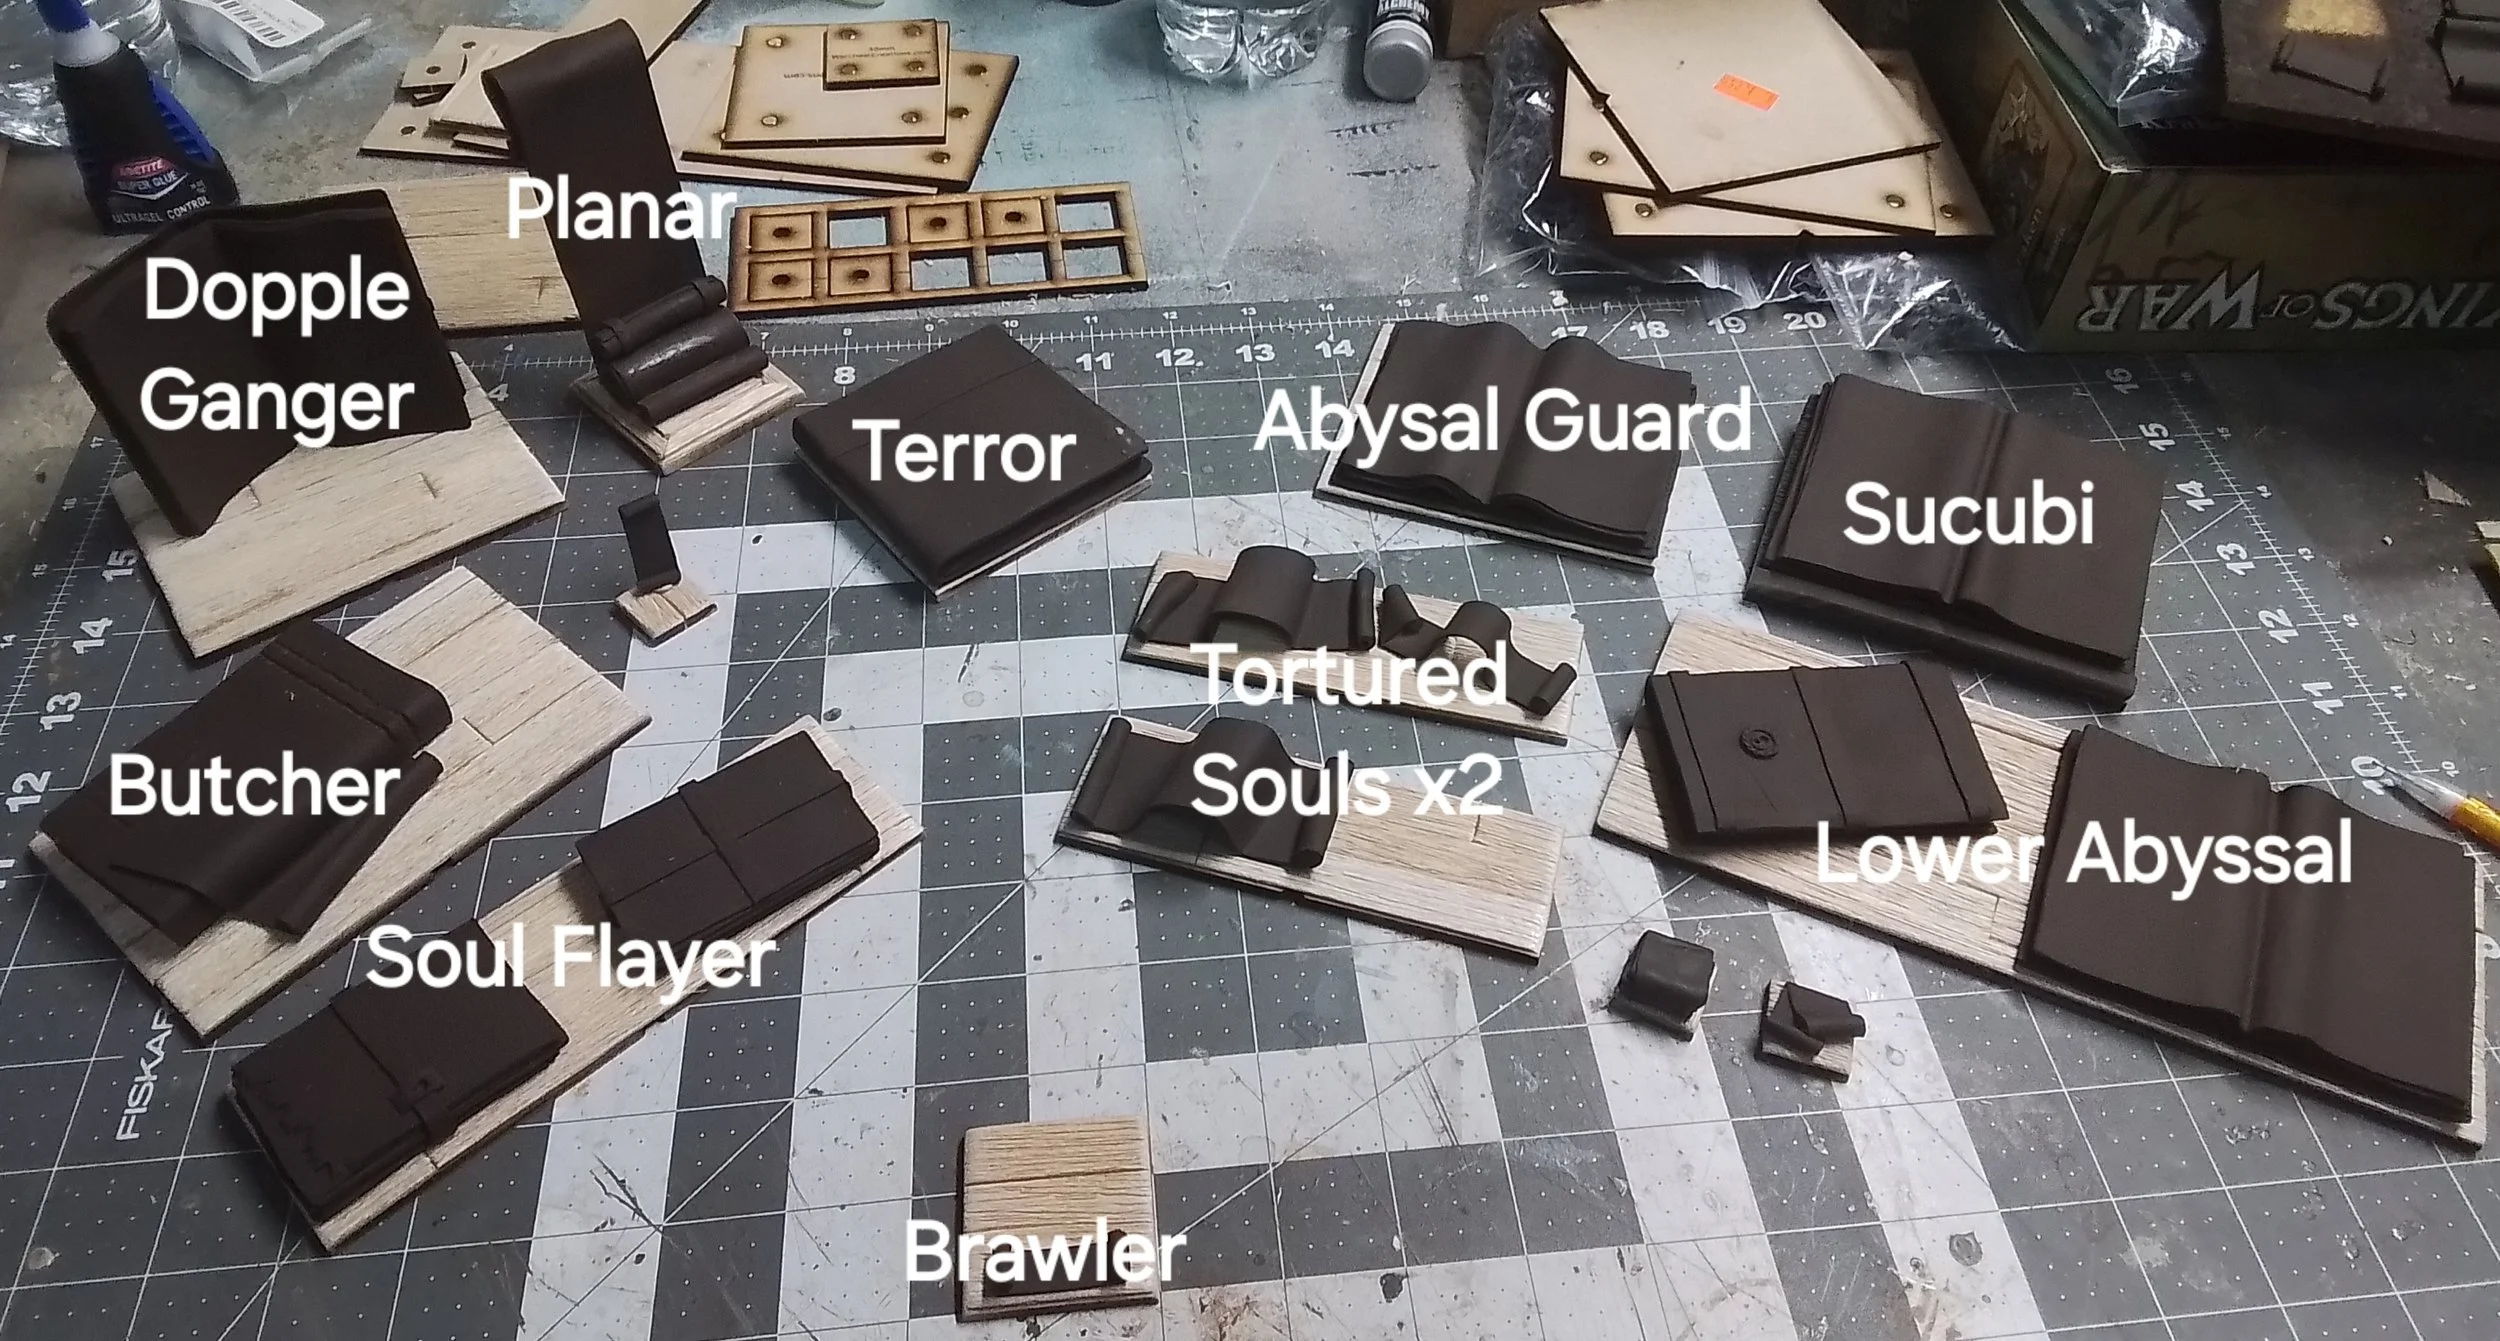
To speed up the process we used precut MDF bases from Warchest Creations. They have a nice leader point notch which is helpful in Kings of War. They also have the option to include magnets which are easy to use as all you have to do is push the magnets into the holes. I didn’t add an glue to the magnets as the tops of the magnets would get glue when I added the wood to the top of the base. I also made sure all the magnets polarity were oriented in the same direction to make stacking them a little easier.
For adding the wooden texture I used a LOT of 1/16” x 1/2” x 36” strips of balsa wood. Prior to mounting the boards on the base I used an hobby knife and a wire brush to “carve” a wood grain pattern into the surface. I found adding the texture to the full 36” length of each prior to cutting them down was more efficient. The texture really gave the boards a worn out look and made them much easier to dry brush when it was time for paint. I ran the boards horizontally so that all the bases would blend in with flooring, shelves and tabletop. I glued the first board centered on the base so that all the bases would be symmetrical. This would also make it easier to sink the basing into the display board and match it up with surrounding wood surface if we chose to integrate the basing into the display board. We chose not to do it given it would have made the display board a lot less flexible in terms of where units could have been placed. I staggered the boards in a haphazard pattern to give the impression of a wood floor. I used wood glue to adhere the boards and held them in place for drying with some dollar store cloths pins. One trick I learned over time was that it was easier to have the boards overhang the base slightly and once the glue was dry I cut them to final length with a hobby knife to the underside using the base as a cutting guide. It gave a clean look to the bases.
There were a couple of bases that were a bit different than the rest. First was the Succubi base which had a book lecturn built into the top of the base. The other was the Mind Sreech base. The vertical scroll was mounted to a piece of sintra (plastic board) that tabbed into the base. I added extra wooden detail and a few extra rolled up scrolls to add weight to support the heavy weight of the model.
Given the scale of this project I bought and used all the available 1/2” wide balsa strips from our local hobby shop. I unsuccessfully tried to use 1/2” bass wood but it was very difficult to carve in as it’s much harder than balsa. So I ended up using 1/16” x 1” strips. To make them work I started by adding a line down the middle to make it look as if it was two separate 1/2” boards. I then textured the boards with wire brushes as I did previously.
For painting I sprayed all the bases with Earth Brown camouflage paint. I then touched up any spots missed with Raw Umber acrylic paint before dry brushing them very lightly with Raw Sienna. Less is more when it came to painting the bases. One other note is that we did include a full set of blank bases to use in our game that were fully textured and painted. It was a small detail that really helped to sell our theme.


While the bases and books were being created and painted we took a number of opportunities to trial fit models to the bases. This allowed us to try out figures in several poses and determine how many models would be required to fill the base. We also swapped out scrolls and books across different bases until we found the best look for each unit. One interesting note is that when we trial fit the Soul Flayers on the scroll I created for the base they did not fit. One interesting thing we stumbled into was that Sculpy stays pliable after baking. After heating the scroll with a hair dryer I was able to unroll one of the ends of the scrolls to make the models fit. After a little paint touch up the base was ready for action. One final word of caution on Sculpy is that it’s easily cracked or chipped in the thickness we used to create the scrolls and books. Fortunately, we leaned into this damage to enhanced the worn and tattered look of the books and scrolls.


I started painting the books by giving them a base coat of Earth Brown camouflage paint with a rattle can. Next I airbrushed all the parchment with the bone triad from the Army Painter Warpaints Air range. I started by building up several layers of Charred Bone over the Earth Bone while trying to keep the Earth Brown showing in deepest recesses. Next I applied several layers of Skeleton Bone followed by a highlight of Bleached Bone. I tried to achieve a mottled look and push the highlights to the edges and raised areas of the parchment.
With the parchment completed I painted the covers in a variety of interesting colors using various triads from the Army Painter Warpaints Air range. Just as with the parchment I tired to achieve a mottle look and focused the highlights to the edges and raised areas that would see the most wear. I used bits of cardstock and tape to cover areas of parchment to avoid getting the overspray and paint splatter on the parchment. After this I cleaned up several sloppy spots and areas impossible to airbrush without hitting the parchment. Finally, I painted a few details and the books and scrolls were complete. As I’m fairly new to airbrushing I was very excited to how they turned out.


After the painting was completed I added text and illustrations to the many of the scrolls and books. Black text and line art was added using a Micron pen under heavy magnification. As many of the surfaces were curved I created a template to ensure the text would go on straight and the lines would be consistently spaced. Given the small area to work in I started with the odd number lines first and followed by the even lines after the ink was dry. Before writing out the text I broke down the text based on the number of characters in each line to ensure the text would fit. The map was sketched out in pencil before inking it in with the Micron pen. Water colors were used to add color to the map and make it pop a bit more.
One thing that is hard to notice is that the text of each book ties it to the applicable unit. In the case of the Succubi the two pages are covered with a map of the Abyss along with information on the Third Circle where the Succubi reside. The bulk of the text was pulled from the Kings of War: World of Pannithor book available for free on the Mantic Website. The book for the Doppelgangers includes sketches and research notes from some unfortunate person foolish enough to make contact with them. To sell the unit coming out of the book we added an arm to the Doppelganger sketch in the book painted to match the rest of the unit.
The finished bases turned out to be the visual focal point of the army and were instrumental in selling the theme. I was a little heartbroken, however, having to cover up most of this beautiful work with models.


